Ubuntu 14.04 LTS (Trusty Tahr) will be released tomorrow and since many of you will install it as soon as it’s released (or maybe you’re already using Ubuntu 14.04), here’s a list of 10 useful things to do to get a near perfect desktop.
While the tweaks below are targeted at Unity, many of them also work with other Ubuntu flavors like Xubuntu, Kubuntu, Lubuntu or Ubuntu GNOME.
1. Install Ubuntu AppIndicators (applets)
Ubuntu ships with just a few indicators by default because well, it can’t guess what everybody needs. So here are some indicators you might find useful.
1.1Calendar Indicator is one of my favorite Ubuntu indicators. This AppIndicator displays your 10 upcoming events in the indicator menu, can add new events (which of course, are synced with Google Calendar) and it has a complete calendar view where you can see all your Google Calendar events, edit or add new events, etc.
To install Calendar Indicator in Ubuntu 14.04, use the following commands:
sudo add-apt-repository ppa:atareao/atareaosudo apt-get updatesudo apt-get install calendar-indicator
1.2 Pidgin may not be the default IM client for a few Ubuntu releases, but it’s still a very popular application. Pidgin uses a tray icon by default but you can now use an AppIndicator which is especially useful since the old Unity systray whitelist is no longer available.
Pidgin Indicator is not an part of Pidgin by default but it works great and you can install it in Ubuntu 14.04 by using the main WebUpd8 PPA:
sudo add-apt-repository ppa:nilarimogard/webupd8sudo apt-get updatesudo apt-get install pidgin-indicator
Once installed, open Pidgin and from its menu select Tools > Plugins, then scroll down until you see a plugin called “Ubuntu Indicator” and enable this plugin.
1.3 Since Ubuntu doesn’t ship with a weather indicator, I recommend My Weather Indicator, an appindicator that displays the current weather on the Unity top panel. The tool can also display a 5-day forecast (it depends on which Weather service you use), it comes with some very nice (optional) desktop widgets and more.
To install it in Ubuntu 14.04, use the following commands:
sudo add-apt-repository ppa:atareao/atareaosudo apt-get updatesudo apt-get install my-weather-indicator
1.4 Variety is more of a fully featured application than just a simple AppIndicator, but I’ll add it here anyway since I’m sure many of you will love it.
Variety is a wallpaper changer that automatically downloads and changes your wallpaper on a given interval. Using it, you’ll get cool, fresh wallpapers each day. Or each hour. Or… well, it’s up to you when the wallpaper changes. From the AppIndicator menu you can quickly switch to the next (random) wallpaper or copy the wallpaper to favorites, for later use.
To install Variety in Ubuntu, use the following commands:
sudo add-apt-repository ppa:peterlevi/ppasudo apt-get updatesudo apt-get install variety
1.5 Cpufreq Indicator is the equivalent of the old GNOME CPU frequency scaling applet which can be used for changing the CPU frequency on-the-fly. Install it in Ubuntu by clicking the button below:
Or install it from the command line:
sudo apt-get install indicator-cpufreq
Note that Cpufreq Indicator doesn’t work with Intel P-State (see 8.2).
For more Ubuntu indicators, see our AppIndicator tag.
2. Tweak Unity
2.1 Some Unity settings are available in the Appearance settings, some in CCSM, some can only be accessed via Dconf and so on. With Unity Tweak Tool, you have access to almost all these settings in one place, using a very nice user interface.
Unity Tweak Tool allows you to change various Unity settings, like auto-hide behavior, tweak the Dash, the Unity Launcher or HUD, change window snapping and hot corner settings, change the GTK and icon theme, access various font settings and more.
To install Unity Tweak Tool from the Ubuntu Software Center, click the button below:
Or, install it in Ubuntu 13.10 via command line:
sudo apt-get install unity-tweak-tool
2.2 Privacy
By default, Dash displays all the recently accessed files along with other files found on your system. But you can change this by selecting Security & Privacy from System Settings, and then tweak everything to suit your needs:
On the Search tab, you can select to disable online search results from being displayed in Dash. However, you may want to use some scopes so instead of completely disabling this, you can open Dash and on the applications lens (the second lens) click “Filter results”, then select “Dash plugins” - here, you can enable/disable any Dash plugin you want:
To disable a plugin, click it and then simply click “Disable”:
If you want to disable the shopping suggestions, you can run the following command in a terminal:
gsettings set com.canonical.Unity.Lenses disabled-scopes "['more_suggestions-amazon.scope', 'more_suggestions-u1ms.scope', 'more_suggestions-populartracks.scope', 'music-musicstore.scope', 'more_suggestions-ebay.scope', 'more_suggestions-ubuntushop.scope', 'more_suggestions-skimlinks.scope']"
2.3 An option to enable minimize on click for the Unity Launcher was one of the most requested Ubuntu features and you can now enable this in Ubuntu 14.04.
To enable minimize on click for the Unity Launcher (Unity Tweak Tool doesn’t support this yet), install CompizConfig Settings Manager. You can install it by clicking the button below:
Or, to install it via command line, use:
sudo apt-get install compizconfig-settings-manager
Then, open CompizConfig Settings Manager from Dash, click the “Ubuntu Unity Plugin” and on the Launcher tab, enable “Minimize single window applications (unsupported)”:
Note that this feature only works with single window applications.
2.4 Try the new locally integrated menus (LIM)
Ubuntu 14.04 ships with a new (non-default) type of menu called “LIM”, or “locally integrated menu”. Locally integrated menus are displayed in the window decorations for unmaximized windows, instead of the default Unity approach which is to display the menu on the top panel, and are displayed on mouse over.
Since the Unity global menu is not appreciated by everybody, maybe you’ll find LIM better, so give it a try. To enable it, open System Settings > Appearance and on the Behavior tab, select to show the menus “in the window’s title bar”:
3. Fixes
3.1 Get Firefox to support H.264
The FFmpeg plugin for GStreamer 0.10 is not available in the official Ubuntu 14.04 repositories (because FFMpeg is not available either - libav is used instead) and because of this, Firefox doesn’t support the H.264 codec.
Furthermore, without the FFmpeg plugin for GStreamer 0.10 package, KDE apps can’t play H.264 videos in Kubuntu 14.04 if they use the GStreamer backend. Another issue with this is that Amarok can’t play WMA files. There might also be other affected applications.
Before:
After:
To “fix” this, all you need is install the “gstreamer0.10-ffmpeg” package and its dependencies. If you’ve upgraded from an older Ubuntu version, this package might already be installed but if this is a fresh install, you can get the package from a PPA. Add the PPA and install it using the following commands:
sudo add-apt-repository ppa:mc3man/trusty-mediasudo apt-get updatesudo apt-get install gstreamer0.10-ffmpeg
3.2 Fix Skype not using the correct system theme on 64bit
On 64bit Ubuntu systems, Skype uses the Clearlooks theme instead of the default Ubuntu theme, Ambiance (this also happens with other themes).
This occurs because Skype is a 32bit application and the GTK2 theme engine (Murrine or Pixmap in most cases) is not installed for 32bit.
Before:
After:
To fix this, you need to install the 32bit Murrine and Pixmap GTK2 engines:
sudo apt-get install gtk2-engines-murrine:i386 sudo apt-get install gtk2-engines-pixbuf:i386
4. Web browser (Firefox, Google Chrome / Chromium) tweaks
4.1 Firefox, Google Chrome/Chromium: if you want to use services such as Netflix, Maxdome and others, you can use Pipelight. Pipelight lets you use Microsoft Silverlight, Widevine (the built-in Chrome Widevine doesn’t work with many websites), and more with native Linux web browsers (Pipelight itself uses Wine).
Before installing Pipelight, it’s strongly recommended to close your web browser. Without doing this, the plugin may fail to install or crash the browser (you can copy the instructions below to a text editor).
To install Pipelight in Ubuntu 14.04, you can use its official PPA. Add the PPA and install Pipelight using the commands below:
sudo apt-add-repository ppa:pipelight/stablesudo apt-get updatesudo apt-get install pipelight-multi
Then, install the Silverlight plugin using the following command:
sudo pipelight-plugin --enable silverlight
To install the Widevine plugin, use the command below:
sudo pipelight-plugin --enable widevine
A lot more about Pipelight, here: Pipelight: Use Silverlight In Your Linux Browser To Watch Netflix, Maxdome Videos And More
4.2 Chromium will soon
stop using the Netscape Plugin API, and as a result, the Linux Adobe Flash will stop working. To get Flash working in Chromium, you can use the
Pepper Flash Player installer (Pepper Flash is extracted from Google Chrome), which is available in the official Ubuntu 14.04 repositories. To install it, use the following commands:
sudo apt-get install pepperflashplugin-nonfreesudo update-pepperflashplugin-nonfree --install
For more about this, see: Pepper Flash Player Installer For Chromium Available In The Ubuntu 14.04 Repositories
4.3 Firefox doesn’t use native notifications under Linux. A work-around for this issue is to use GNotifier, a Firefox
extension that makes the browser use native notifications on the Linux desktop. The extension currently supports GNOME (Shell), Unity, KDE and Xfce.
The extension is available HERE and doesn’t require restarting the browser after it’s installed.
5. LibreOffice tweaks
LibreOffice has 2 cool features (well, one of them isn’t exactly a feature but anyway) that aren’t enabled by default: a sidebar that enables quick access to document styles, formatting, etc. and a cool new monochrome icon set.
5.1 To enable the LibreOffice sidebar, simply select View > Sidebar from the LibreOffice menu.
5.2 To use the monochrome icon set, firstly install it by clicking the button below:
Or, install it via the command line using:
sudo apt-get install libreoffice-style-sifr
And then to activate it, from the LibreOffice menu select Tools > Options > LibreOffice > View and select “Sifr” under “Icon size and style”:
6. Nautilus “tweaks”
The heading says “tweaks” in quotes because one of them is not exactly a tweak, but a replacement.
6.1 Use the search / type-ahead feature that suit your needs
In Ubuntu 14.04, Nautilus was patched to use type-ahead find instead of its default behavior for a few Nautilus releases, which is recursive search. However, there’s a Dconf option you can use to switch between these two behaviors.
Type-ahead find allows to type the name of a directory or file in the file manager to select it without searching in the sub-folders while the recursive search is, like the name suggests, a search inside the current folder and all its sub-folders.
 |
| Recursive search |
 |
| Type-ahead find |
To switch to recursive search in Nautilus under Ubuntu 14.04, use the following command:
gsettings set org.gnome.nautilus.preferences enable-interactive-search false
If you want to switch back to type-ahead find (“interactive search”), use the command below:
gsettings set org.gnome.nautilus.preferences enable-interactive-search true
More info: Nautilus Type-Ahead Find Feature Enabled By Default In Ubuntu 14.04
6.2 If you don’t like Nautilus 3.10, switch to Nemo
As you know, Ubuntu 14.04 uses Nautilus 3.10 as the default file manager. Nautilus is nice, but it lacks many features it once used to have, like the dual pane view (which was triggered using F3). You can get this back by using Nemo, which I patched to work properly under Unity and to get rid of the Cinnamon dependencies (the original patches were created by Jacob Zimmermann, I just updated them for a newer Nemo version and added some other patches for better desktop integration).
Since there are some quite a few things you should know before replacing Nautilus with Nemo in Ubuntu 14.04, I won’t post the instructions here, but you can read all about it in an article I posted a while back: Install Nemo With Unity Patches (And Without Cinnamon Dependencies) In Ubuntu (it includes instructions for replacing Nautilus with Nemo, installing some Nemo extensions as well as how to revert the changes in case you want to go back to Nautilus as the default file manager).
7. Nvidia Optimus tweaks
Note for AMD hybrid graphics users: you can use
fglrx-pxpress and
AMD Indicator which are basically the equivalents of the tweaks below for AMD, but since my laptop uses Nvidia Optimus, it means I can’t test this on AMD hybrid graphics so I won’t post instructions here. See the Ubuntu
wiki for more info.
7.1 Switch between Nvidia and Intel graphics
Installing nvidia-prime can get your system to boot in low graphics mode if it’s not used properly so be careful. This should be considered an “expert” feature and should only be used by those who know how to fix their system in case something goes wrong!
It’s also important to note that you need to use LightDM (so this won’t work for Ubuntu GNOME users by default because it uses GDM - you’ll need to switch to LightDM) and the proprietary Nvidia drivers!
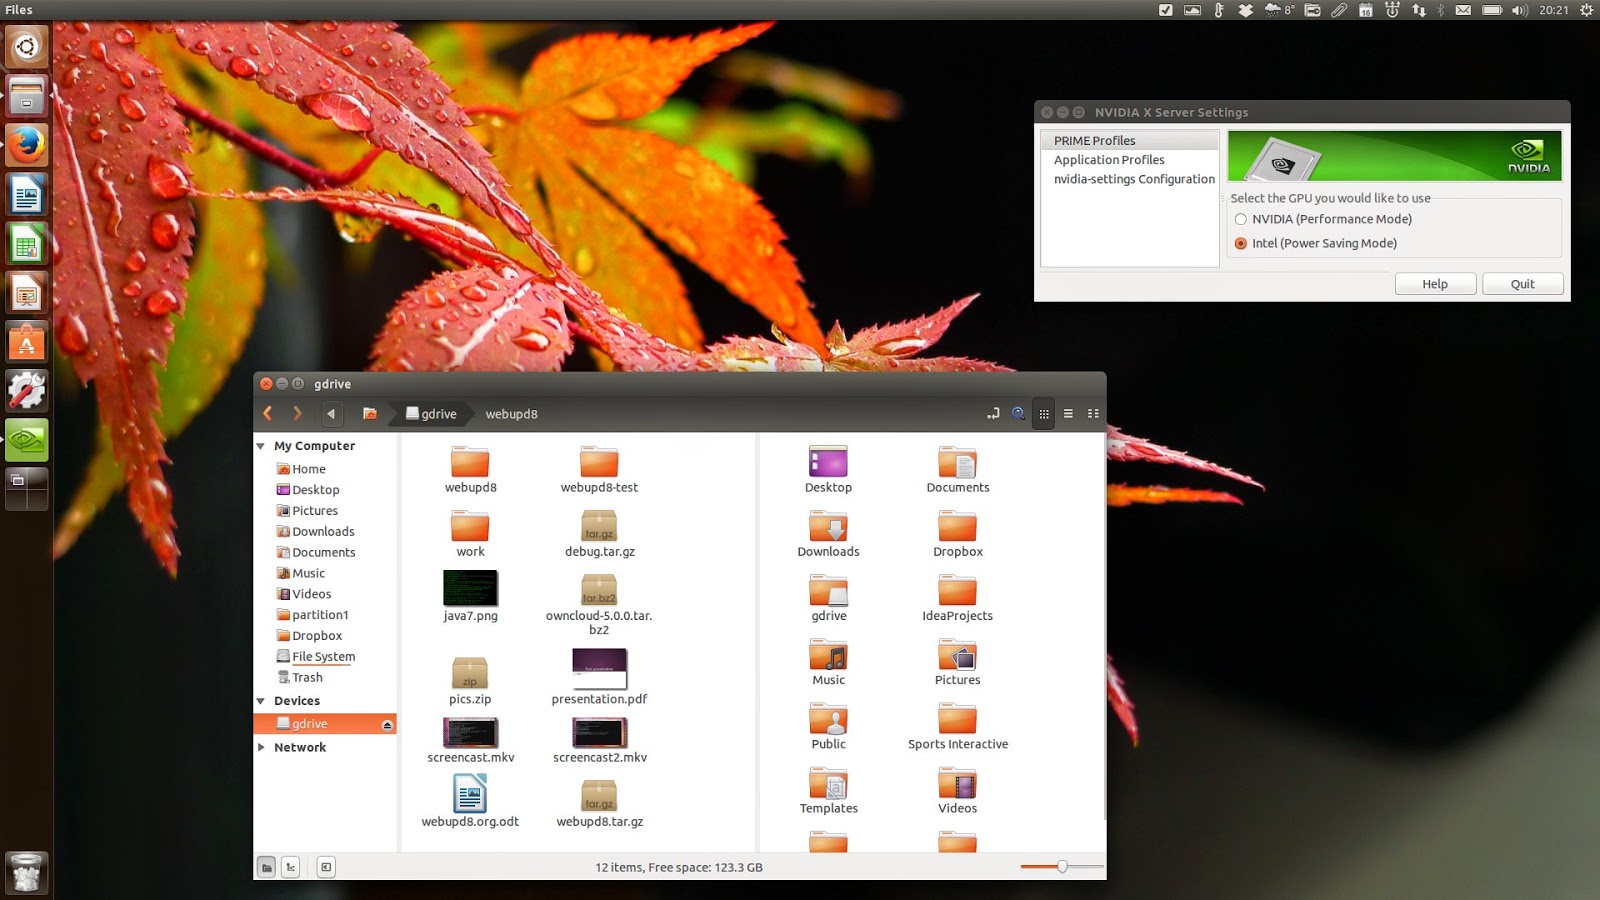
In Ubuntu 14.04, you can switch between the Nvidia and Intel graphics from the Nvidia Settings. Firstly, install nvidia-prime:
sudo apt-get purge bumblebee*sudo apt-get install nvidia-prime
(the first command makes sure all the Bumblebee packages were purged - without this, nvidia-prime won’t work)
Then simply open Nvidia Settings, select “PRIME Profiles” on the left and select the graphics card you want to use:
Note that switching between CPUs requires a logout so you can’t for instance run the desktop using the Intel graphics while running a game using the Nvidia graphics under the same session. For that you can continue to use
Bumblebee, but unfortunately you can’t use both, so remove
nvidia-prime if you want to use Bumblebee.
7.2 Prime Indicator (requires the nvidia-prime package, see 7.1)
To quickly switch between the Intel and Nvidia graphics or see which graphics card is currently in use, you can use Prime Indicator. You can install it in Ubuntu 14.04 using the following commands:
sudo add-apt-repository ppa:nilarimogard/webupd8sudo apt-get updatesudo apt-get install prime-indicator
8. Laptop tweaks
8.1 Improve battery life
There are various tweaks that you can apply to your laptop to save battery power, but many of them depend on the hardware, Linux distribution, some are outdated or too hard to apply for regular users and so on.
TLP is an advanced power management command line tool for Linux that tries to apply these settings / tweaks for you automatically, depending on your Linux distribution and hardware.
To install TLP in Ubuntu 14.04, use the commands below:
sudo add-apt-repository ppa:linrunner/tlpsudo apt-get updatesudo apt-get install tlp tlp-rdwsudo tlp start
Important: make sure laptop-mode-tools is not installed (simply run “sudo apt-get remove laptop-mode-tools” and it will be removed if it’s installed), as it conflicts with TLP.
For more information, see our article on TLP.
8.2 Thermald + Intel P-State
While some users have reported that their laptops actually get a bit hotter using this, but that they get better performance with Thermald + Intel P-State (
see the comments), for my laptop, this has done wonders and I can say that my now quite old laptop was never cooler. That of course might not be the case for you (since it depends on your hardware), but you can give it a try and see for yourself.
9. Install codecs, Java and encrypted DVD playback
9.1 To be able to play most audio and video formats, install Ubuntu Restricted Extras by clicking the button below:
Or install it using the following command:
sudo apt-get install ubuntu-restricted-extras
9.2 I suggest to also install the unrestricted version of libavcodec so you don’t encounter issues with missing codecs when trying to use some video editors or transcoders - install them by clicking the button below:
Or by using the following command:
sudo apt-get install libavcodec-extra
9.3 You may also need Java, but you must figure out what you need. Most users will only need OpenJRE and the Java browser plugin which you can install by clicking the button below:
Or by using the following command:
sudo apt-get install icedtea-7-plugin openjdk-7-jre
For development, you’ll also want OpenJDK which you can install by using the button below:
Or by using the following command:
sudo apt-get install openjdk-7-jdk
If for various reasons, you need
Oracle Java (the package includes JDK, JRE and the browser plugin), you can install
Oracle Java 7 by using the following commands:
sudo add-apt-repository ppa:webupd8team/javasudo apt-get updatesudo apt-get install oracle-java7-installer
9.4 Encrypted DVD playback: the Medibuntu repository
no longer exists and while most packages in the Medibuntu archive are obsolete or unnecessary because most are now in the official Ubuntu repositories or have better equivalents,
livdvdcss is still required for playing encrypted DVDs.
You can enable encrypted DVD playback in Ubuntu 14.04 by using the following commands:
sudo apt-get install libdvdread4sudo /usr/share/doc/libdvdread4/install-css.sh
10. Other tweaks / things to install
10.1 As you probably know by now,
Ubuntu One will be shut down. If you were using this cloud storage service, there are many alternatives you can use, which work under Linux. Dropbox is probably the most popular, but you can also use Google Drive, which is getting better and better and it’s cheap too if you want some extra space (you also get 15GB of free storage).
There’s no official Google Drive client for Linux (yet), but you can use a tool like
Insync (paid), or
Google Drive Ocamlfuse, a tool that lets you mount Google Drive in Linux. To install Google Drive Ocamlfuse in Ubuntu 14.04, use the following commands:
sudo add-apt-repository ppa:alessandro-strada/ppasudo apt-get updatesudo apt-get install google-drive-ocamlfuse
Once it’s installed, you’ll firstly need to authorize it with Google, by running the following command:
google-drive-ocamlfuse
This should open a tab in your default web browser, asking to allow google-drive-ocamlfuse to access your Google Drive. Click “Allow”, wait a few seconds for google-drive-ocamlfuse to retrieve the authorization code and you’re done.
Now let’s mount Google Drive. Create a folder in your home directory, let’s call it “gdrive”:
mkdir ~/gdrive
And mount Goole Drive using the command below:
google-drive-ocamlfuse ~/gdrive
That’s it.
More info: Mount Google Drive In Linux With google-drive-ocamlfuse
10.2 If you’re constantly getting crash report popups, disable Apport
Apport is disabled by default in stable released according to THIS (thanks Silviu!) however, it’s not disabled if you’ve installed an alpha, beta or daily build.
Reporting bugs is important for Ubuntu, but if you get a large number of crash reports and nothing is actually crashing, you can disable error reporting. To do this, you need to edit “/etc/default/apport” with a text editor such as Gedit (as root):
gksu gedit /etc/default/apport
and change “enabled” from “1” to “0”, then save the file.
After completing the steps above, Apport won’t be started at boot any more, but let’s stop the running Apport process too, so you don’t have to wait until you restart your computer:
sudo service apport stop
More info: How To Get Rid Of Internal System Error Apport Popups In Ubuntu
10.3 Unity global menu & HUD support for Java swing applications
By default, Java Swing applications (IntelliJ IDEA, Android Studio, jDownloader and others) don’t support Unity global menu (AppMenu) / HUD. You can get these features though, by using JAyatana, which you can install in Ubuntu 14.04 by using the following commands:
sudo add-apt-repository ppa:danjaredg/jayatanasudo apt-get updatesudo apt-get install jayatana
Once installed, log out and log back in.
More info: Get Unity Global Menu / HUD Support For Java Swing Applications With JAyatana
10.4 Adobe Flash Player (YouTube and a few other websites only, it seems) hardware acceleration with Intel graphics
libvdpau-va-gl is a VDPAU driver that uses OpenGL under the hood to accelerate drawing and scaling, and VA-API (if available) to accelerate video decoding.
Using it, you can get hardware acceleration on some Intel graphics cards for Mplayer (well, we already have mplayer-vaapi but it hasn’t been merged) and even Adobe Flash Player. That means a lot less CPU usage.
For instance, in my test, a full-screen 1080p flash YouTube video used around 160-170% CPU without libvdpau-va-gl and about 14-17% CPU when using libvdpau-va-gl:
Since there are a few things you should know and the instructions include 2 use cases, I won’t post the instructions here and instead, I’ll add a link to our libvdpau-va-gl article: Adobe Flash Player Hardware Acceleration on Intel Graphics Cards
How about you? What are the things you usually do after installing Ubuntu?